How to Become a Freelance Writer, Quit Your Job, and Travel the World in 6 Months

So you want to become a freelance writer, work from home, and make enough money to live a comfortable life.
That’s not so hard to do if you follow the right steps.
📝 Editor’s note: This guide is written by Ivan Kreimer, a freelance writer and marketer.
Today I want to show you how I went from being broken without a clear idea of what to do with my professional life to travel the world and get paid to write articles.
All of this in a short period of 6 months—with no experience and without having to work for a marketplace like Upwork.
Let’s get started.
Behind every step you take, from just starting to making six figures a year writing, you need to have a clear purpose.
Here’s the thing:
All the tasks you’ll have to do to become a freelance writer — all the tasks you’ll see throughout this guide — will take a lot of effort.
You will fail, and you will face challenges.
The only thing that will keep you from keeping your day job (the one that’s not fulfilling you) is your purpose.
Your purpose is the engine that drives your writing career forward.
Gary Keller, author of The ONE Thing, explains this idea clearly in the following graphic:
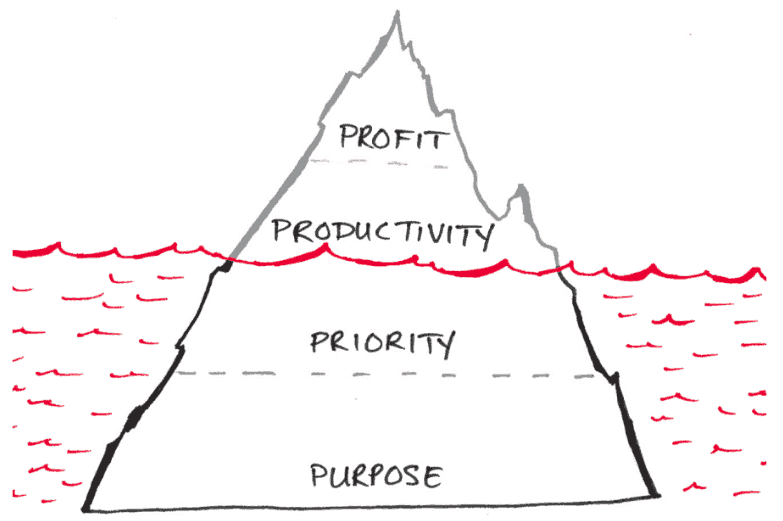
Before you can get anything meaningful done — what people call “productive” — you need to know why you want to do it.
In my case, I discovered why I wanted to become a freelance writer after I applied to a job posting.
The reality is that I was desperate to get a job. I needed a way to get out of my house and travel the world. But it had to be a remote job; otherwise, it wouldn’t work.
I went to We Work Remotely and found a job listing for a content writer. It seemed like something I could do, so I applied.
As I filled in the boxes with my name, experience, and writing portfolio, I faced a key question that would change my career forever. The question asked:

This is an actual screenshot of the question asked.
I started explaining how writing was my biggest passion. I said I loved to express myself, teach people, and craft narratives with my words.
As I explained why I liked writing and why I wanted to do it for them, I discovered something:
I could actually make a living writing.
It’s an obvious statement, but one that changed my professional life.
Before that, I defined myself as an SEO freelancer, a growth marketer, and a digital marketing consultant, but never as a writer.
Having explained why I liked writing, I realized that’s was my thing.
All the other skills were nice, but they never felt right. Writing, in contrast, felt amazing.
If I loved writing, why couldn’t I dedicate my time to do that?
That inconspicuous exercise helped me find my purpose. It was so easy and simple that it seems like it couldn’t work. But it did for me, and it will surely do for you.

Because finding your purpose is all about looking at skyscrapers and stuff.
There’s a lot of BS around being a writer making pennies a day. Some say that it’s hard to make money writing. Others complain about the amount of work they’ve got to put up to make a reasonable wage.
The idea that writers have a hard time making a living is simply not true.
Here’s what you need to know:
If you suck at writing or at marketing yourself, you’ll starve. Otherwise, you won’t.
Yup, it’s that simple.
There’s no “fear of writing,” only fear of failure.
As long as you provide a valuable service to a company (i.e., your clients), you’ll be fine.
Most importantly, learn to market yourself, drive leads to your services, and sell them (something I will briefly explain later), and you can make an excellent living writing.
There’s no “fear of writing,” only fear of failure.
When it comes to marketing, I have a simple philosophy:
Niche and win.
I know it’s too early to start thinking about your marketing, but this isn’t related to your plan for promoting your business. It’s more subtle.
The niche you define will make or break your future. Choose a bad niche — or worse yet, become a generalist — and you’ll have a hard time finding clients who want to pay for your services.
Find one that’s specific and profitable, and guess what? You’ll have great clients coming your way willing to pay you good money.
I often see writers are afraid of finding a vertical (an industry, a niche) for various reasons. But this lack of confidence in defining their niche — the ambiguity of their specialization — is what kills their business from the get-go.
I want you to think about what you’re good at, what you like, but most importantly, what you can write about for years.
If you want to make a living writing as a freelancer, you’ll have to be willing to write like an expert every single day. The niche you choose will have to fit that requirement; otherwise, you’ll have a hard time sustaining your work.
Here’s what I want you to know: when it comes to your career, specialization always wins.
Here’s why:
The process of finding your niche is similar to your purpose; you don’t just pick it like a pair of shoes, but you slowly get closer to what you like. It will take some testing and experimentation to find your favorite niche, but once you do it, your career will become much easier.
The right niche often lays in the crossroads between your interests, your knowledge, and your experience.
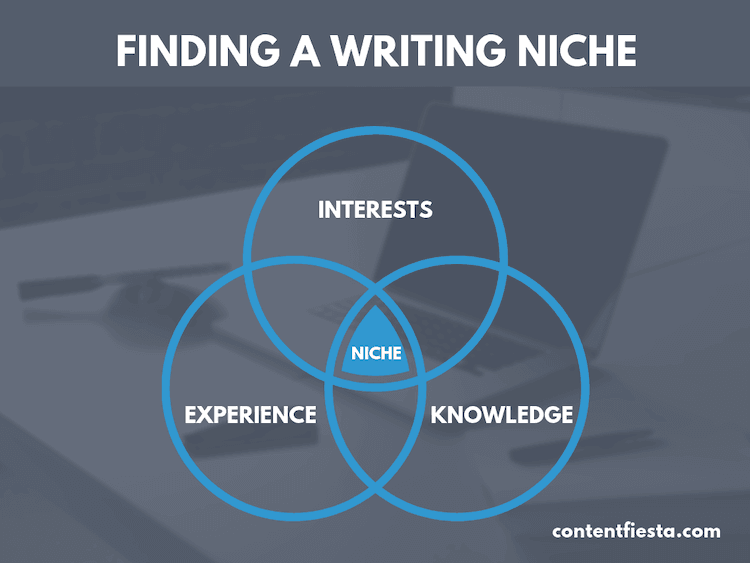
In my case, I’m experienced in marketing and entrepreneurship. I also have experience in SEO, PPC, analytics, and copywriting. For that reason, specializing in writing about these topics was a no-brainer for me.
Also, I have started many businesses — ecommerce, dropshipping, FBA, media sites — and worked for many more — SaaS, agencies — so I knew entrepreneurship and business were good industries for me. While they are still too broad, they helped me find the right sites to pitch (which you will see later) and start my career.
Let’s see how you can find your niche right now.
There’s no reason for me to start this step by explaining to you why you need to have a site. That’s soooo 2005.
In 2020, you need to have a site, even if it’s one-page long.
The people with whom you’ll work want to see your work. Your site is the place where they’ll find everything about you: who you are, what you believe in, what you like writing about, and more.
Your site is like a business card, but better.
Before I show you how to build a simple site, let me make an important clarification.
As soon as you open your site, you’ll be tempted to install an expensive theme or even hire a web designer to help you create the “perfect” site.
Don’t do that.
Your site needs to be good enough, so your visitors (i.e., your potential clients) see your content. It doesn’t have to be beautiful; as long as your content is readable and the look is modern (which includes minimalism), you’ll be fine.
As a rule of thumb, if you spend more than $100 in your website development, you’re overspending.
Later I’ll show you the cost breakdown of opening your site. For the time being, just remember my rule of thumb.
Now that we’ve covered this point, let’s jump right into the next exercise.
There are three critical elements you need to have in place to launch your site:
To get started with the domain, go to GoDaddy, put your site name (I’ll explain more about that later), and get a .com TLD.
Before we got with the exact steps to take, let’s quickly go over the topic of your site’s name.
The name you pick for your site could follow one of two options:
Whatever the option you choose, when you’re just getting started, keep this simple. Eventually, you can redirect everything to a new name site, which isn’t that big of a deal.
It’s so easy to get bogged down on the perfect name for your site, something that ends up becoming an excuse for not starting your freelance writing career.
Don’t let that happen to you. Just pick a name and keep going.
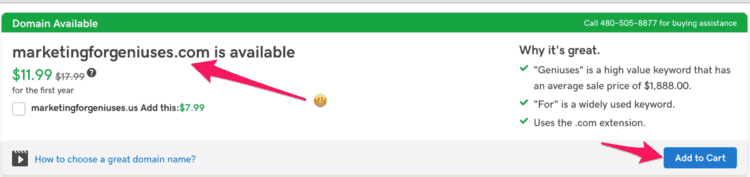
Let’s say your site was called “Marketing for Geniuses.”
(I know, the name it’s not that good, but whatever.)
You’d go to GoDaddy and put marketingforgeniuses.com.

Voilá! The name is available, so you’d have to click the “Add to Cart” button and buy it.
Now, it’s time to get your site’s hosting.
If you search online, you’ll see so many contradictory articles about the best hosting. One will claim Bluehost is the best (I tried them, they’re OK), while another will say that one is horrible and Hostgator is the best. The same with any other hosting company you can think of.
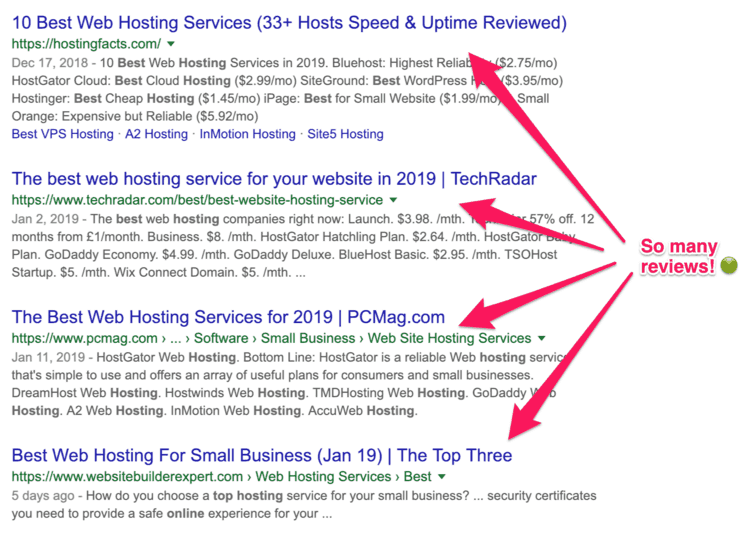
The truth is all of those “honest” reviewers want to make money from the hosting company that pays the best affiliate commissions. They care little about you.
I’ve used three blog hosting companies:
Whatever the hosting you choose, don’t spend more than 1 hour thinking over this. When you have a low budget, all hosting companies look alike, so there’s no point in spending hours going over this decision when you have much larger problems lying ahead.
Once you have opened your hosting account, redirect your domain’s CNAME to your hosting (check your hosting’s directions on how to do it) and install WordPress to it.
If the hosting is good, you should be able to install it with one click and in a few minutes. All the companies mentioned above let you do that, so as any respectable hosting company.
After you’re over that, install a theme. As I said before, don’t spend a lot of money on this.
I’ve used the paid StudioPress themes before, and they’re beautiful and easy to use. The only caveat is that you first need to buy their framework, Genesis, and then buy the site.
While most themes (including the framework) cost between $99 and $129, they’re worth the investment.
You can also use ThemeForest, where you can find themes for not more than $80, but you will get very distracted fast with all the options available, so I don’t recommend this option. Also, their themes rarely offer excellent customer service, so if you have a problem, you’re on your own.
The installation of your theme shouldn’t take you more than 1 minute. After you’ve downloaded the theme’s .zip, you need to go to your WordPress dashboard (which you access to by going to yourdomain.com/wp-admin), go to Themes, click on “Add New.”
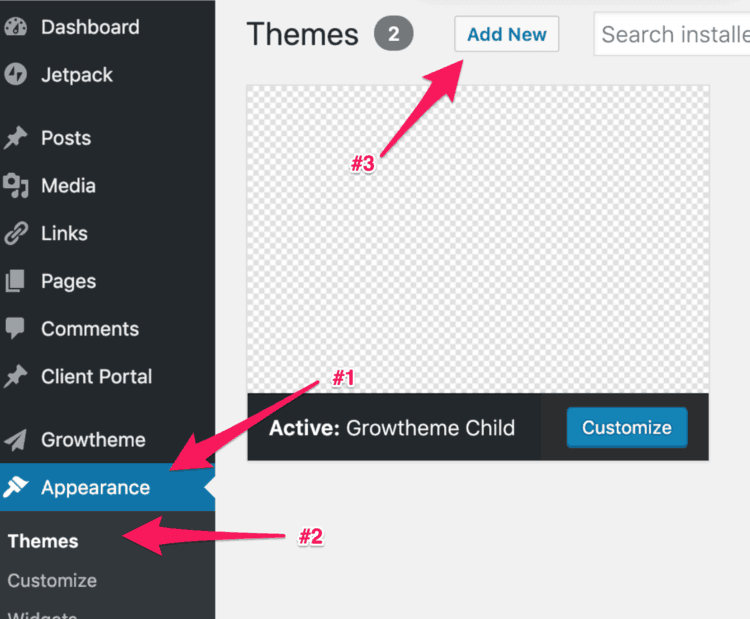
Once in there, click on “Upload” and add the .zip file.
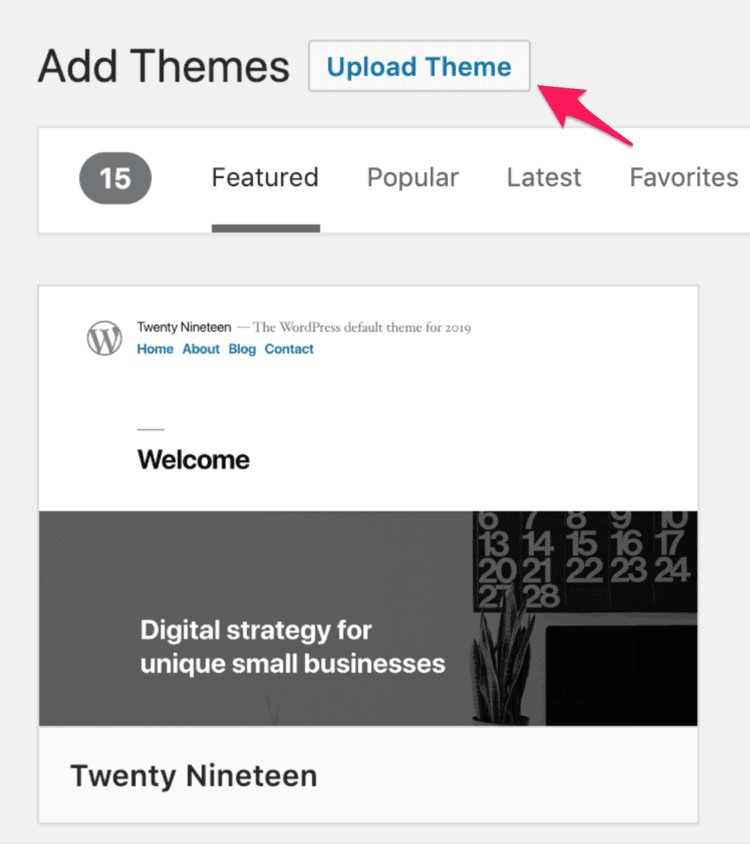
After you do that, WordPress will take care of the rest. You can play around with your theme’s settings and design all you want, but following the previously mentioned minimalist philosophy to launching your freelancing career: keep it simple. Don’t get distracted with this, or you’ll go down the “I want to install all the plugins to make my site look great” rabbit hole that only leads to a lot of headaches.
To summarize your expenses so far:
Quite cheap, eh? 😃
After you’ve set up your site, that’s just the beginning. Now you need to develop the three key pages to make it look like a real site. Those pages are:
When you’re getting started, the home page should be your blog page. To do that, go to Settings > Reading. Then, under “Your homepage displays,” make sure you have “Your latest posts” selected.

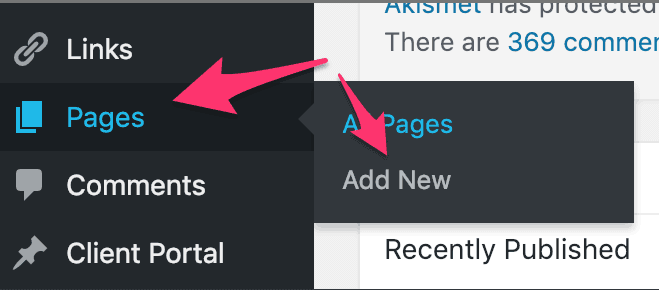
After you’re done with that, create your about page. To do that, go to Pages > Add New.
The about page is one of the most important and underrated parts of your site. It’s the place where you tell your visitors what your site and company is all about. It’s an opportunity to connect.
Take a look at my own about page:
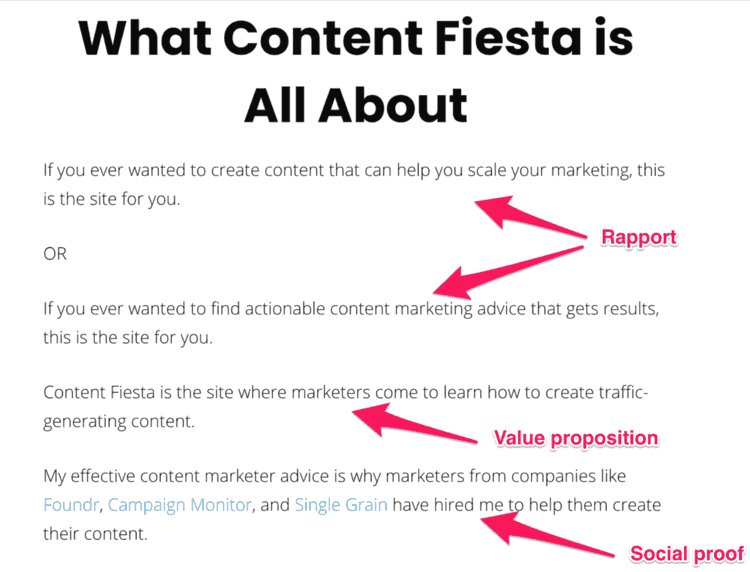
While you can’t see that in this image, I start with a headline that says, “Want content that drives traffic? You have come to the right place.” This already connects with the reader, who’s probably wondering who I am and what I’m all about.
Then, I start by creating some rapport with the reader, as you can see in the image above. I follow up with my value proposition, which is one sentence long for increased impact.
I close by adding some social proof at the end. The about pages continues later, but by then, I have connected with my audience, I have explained my value proposition, and I have validated myself.
What all great about pages have in common is that they allow the visitor to learn more about you, connect with you, and become convinced you’re the #1 expert in the topic.
Finally, the contact page should be as simple as possible. Use a plugin like ContactForm7 or do as I do and embed a Typeform to your page (here’s how to do it).
The most crucial aspect of your contact page should be that it be made for your leads.
That means your contact form must include the following fields:
With this, you’re done! You have a primary site set up and ready to go.
After the site, your portfolio is the other essential part that you need to have in place to launch your freelance writing business.
While your site can work as a portfolio, there’s one company that lets you set up one in minutes, showcasing all the great content you’ve published: Contently.
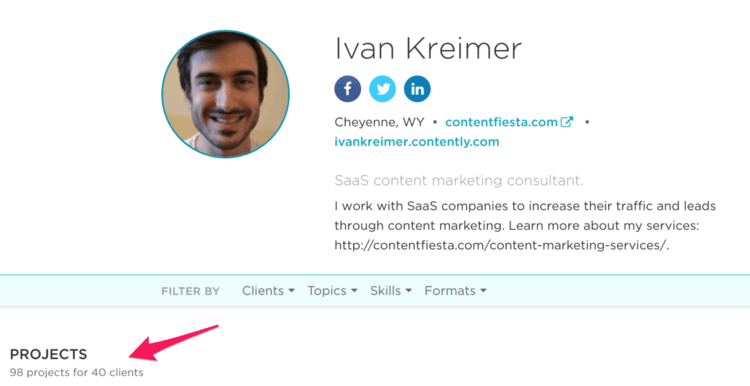
Your clients will want to see a shortlist of sites where you’ve published and the topics you’ve written. Your portfolio will do exactly that.
Here’s how you can do it.
If you want to charge $400 per article or more, you need to show proof of your skills. Your potential customers will want to know how you express yourself, what you can write about, and your writing style.
The best way to show your skills and, at the same time, have people see your content is through guest posting.
The time and energy you spend crafting a high-quality piece for another site for free have a long-term return, but it’s worth doing it.
There are four benefits I’ve found on guest posting:
In my experience, guest posting was the most important aspect that helped launch my freelancing career.
After I had decided I wanted to become a freelance writer, I created a list of +50 high-authority high-traffic sites that allowed for guest contributions.

It took me a few days to find the whole list, including the point of contact, their email address, and the potential topics to write, but it was worth it.
In three months, I had published in +10 sites, some of which drove my first clients, and some others which still got me a few top-notch links.
I probably spent ~50 hours on this — finding the sites, pitching, and writing the pieces — but the clients I got from those efforts brought me over $20,000 for the rest of the year.
If you do the math, I made $400 per hour of work.
That means I worked “for free” upfront, but eventually, I recovered that time through long-term work with the clients I attracted.
I don’t love math, but when it works in my favor, it’s beautiful. 😎
Let’s take a look at what you need to do to start with your guest posting efforts.
👉 To understand the following process in greater detail, I highly recommend you take a look at the in-depth guest blogging guide I wrote.
Pitching is more of an art than a science. You need to learn to pitch properly to be able to land your guest post opportunities.
Let me share with you some of the idiotic pitches I’ve gotten so you can see how you should not pitch other people:
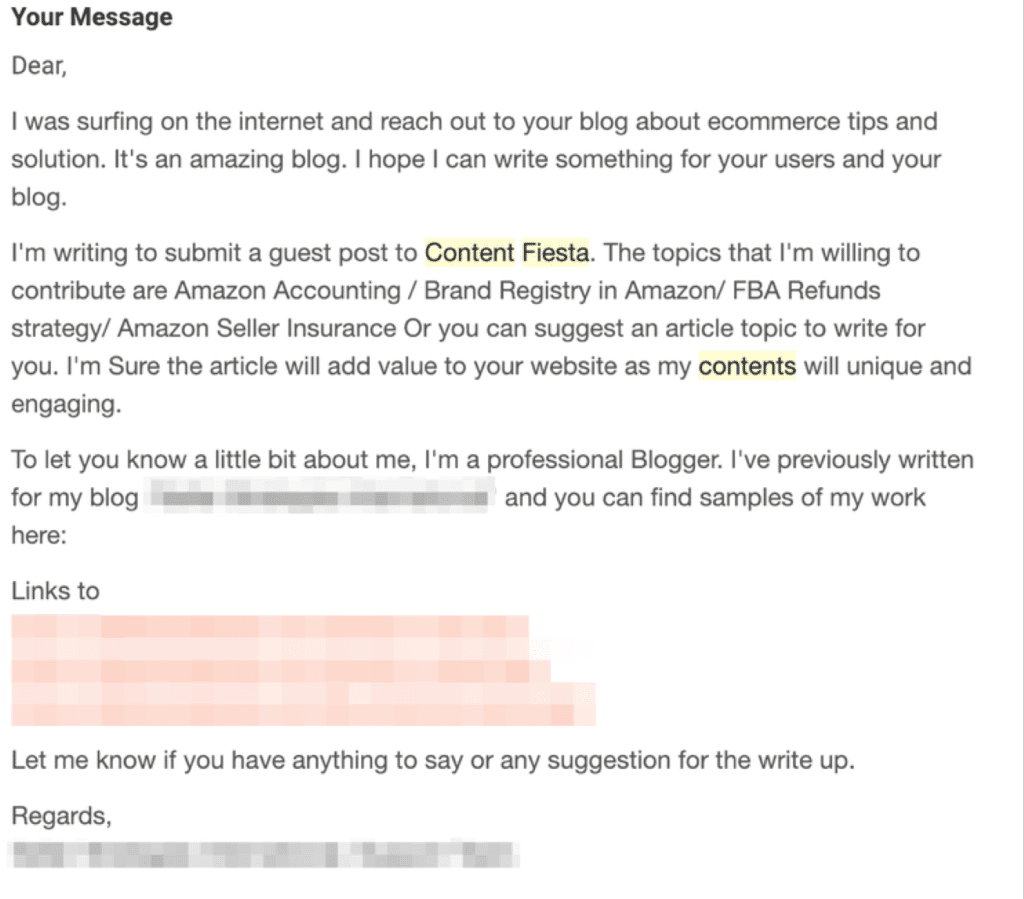
I mean, come on. I have few posts on this site, I’ve never said I accept guest posts, and you send me this?! 🤦♂️
There have been worse cases, mind you:
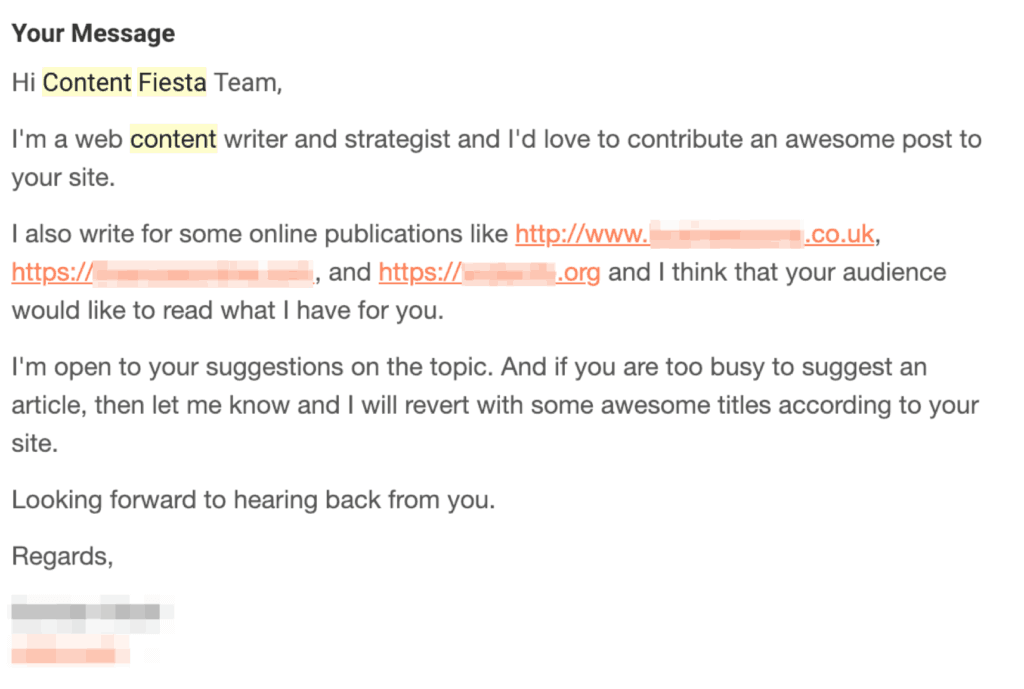
Who said there was a “Content Fiesta Team”? 😂
I could go on and on with awful examples like these ones, but the point is the same: when you pitch, you need to look and act professionally.
To do that, you need to follow two simple rules:
First, respect the point of contact (a blog or marketing manager) — she’s doing her job, so if you don’t waste her time, you’ll be way above everyone else (as the previous examples showed you).
Next to respect, it’s the relevancy of your pitch. Read the guidelines and follow them by heart; there’s nothing as annoying as someone who doesn’t care about you.
What’s more, acknowledge the recipient by naming them and talking about them. As Dale Carnegie said, “A person’s name is to that person, the sweetest, most important sound in any language.” It won’t take you more than a minute to figure it out, so do it.
Also, think about the topics the site publishes, the most successful ones (both link and shares-wise), and what the point of contact publicly likes.
Later I will show you how that looks like — for the time being, take these two rules into consideration. If you get rejected, it may be due to either a lack of respect (even if it’s unintended) or irrelevancy, so your pitch refinement will have to focus on those two aspects.
If you check the previous terrible examples, in no case, they respected those rules.
They were all about their content, they didn’t even know my name, and they didn’t offer me anything I’d remotely care about.
Remember those rules, because you will have to respect them whatever pitch you ever send.
It took me a lot of time and effort to develop my pitching strategy, but after a lot of emails, here’s one of the results of my pitching efforts:
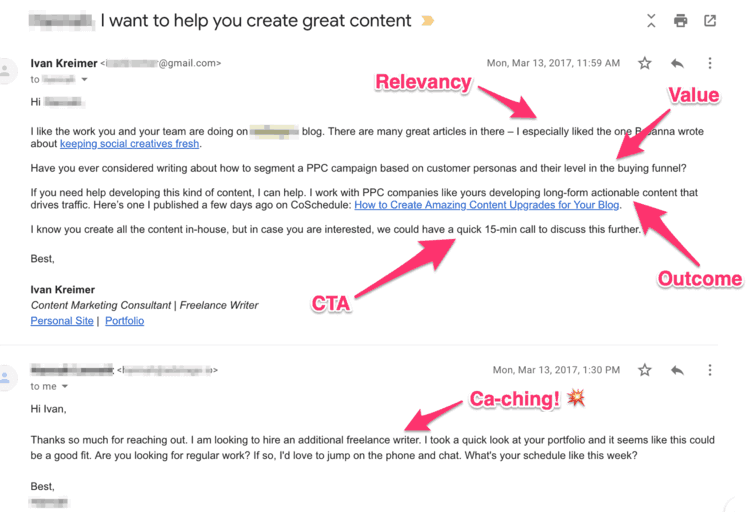
That client alone generated me over $5,000 in six months of work. Not a lot, but nothing to overlook either.
If you follow the advice I’m about to show you, you’re patient and consistent, you’ll be able to reap the same results.
Let’s get started.
Before we get to the exercise, there’s a final hard cold truth you need to know about pitching:
You will get rejected.
Some will tell you they don’t like your writing idea, some will tell you they don’t accept guests (even though they technically do, but that’s for strategic partners), and some will ignore you.
The art of pitching is like salesmanship; rejection and success go hand-to-hand. You have to accept that.
Fortunately, the rejection will be easy to digest — you will get a polite email, or you will be ignored entirely. There will be no shouting involved. Still, you will get discouraged, but the more you keep pitching, the better you will get at it, and the more progress you will make.
If you already have been published in high-authority sites, you will have an easier time getting accepted in other high-authority sites. The opposite will be the case at first, so keep pitching and refining your message as you go.
Pro Tip: It’s best to pitch to a specific person responsible for the blog than a general contact page. If you have no option but the latter, go for it, but don’t expect great results from it.
Writing the article is the part where you show your expertise; it’s the part where you take all your research, ideas, and passion, bake them all together and make them real for anyone to see.
The article itself will depend on the topic you chose, your style, your audience, and much more.
I won’t dwell on the specifics of writing an article because that’d take an entirely new article. Instead, I’ll briefly mention some of the elements the most successful types of content have in common.
First and foremost, the best types of articles that work best are tutorials (also known as how-to’s or guides) for the simple reason you are teaching something. The value is on the lessons taught, the new capabilities your audience has after reading your piece.
Check, for example, this monster guide I wrote about starting a dropshipping business in a week.
The value is in the fact the reader can now take the exact steps I took to get started with his first business. I helped the reader go from zero to hero in a few thousand words. The value is immense and immediate.
What makes that piece special is that it’s based on my personal experience. That’s why I always recommend going a step further and adding a personal story — yours or otherwise.
There are many more writing techniques you can use in your piece, like using catchy intros, 3-step stories, and much more.
Another essential part of any top article is length: as a bare minimum, aim at 2,000 words.
Multiple studies have proven that lengthier content ranks better because, more likely than not, you have more space to give value to your reader.
That’s not to say shorter pieces ever work, but the likelihood of making an impact in 500 words is much smaller than developing a longer piece.
Finally, whenever you write as a guest writer, you want to have two things in place before sending the piece:
When you write on another site, you want to end up with the best impression possible. You already proved yourself with your content, now it’s time to close the loop with some final words about you.
Your bio is a summary of your identity. Often overlooked, the bio is the best place to finish your piece for the simple reason people will trust you by the time they finish your piece. They will want to learn more about you, which includes visiting your site, contacting you, and even signing up for your email list.
Here’s a bio of mine when I started guest posting:

Take some time to write the bio and make it shine. Your bio will change over time, as you will refine it and improve it (especially after you get published in high-authority sites).
Here’s another one after I got a few better sites and targeted a better keyword:

Finally, this is my current bio I use at Foundr (where I used to work):

Note that the bio is concise. I say what I do—freelance content writer—adding a link to my site to gain some SEO points. I also show some social proof of sites where I’ve been published.
On the other hand, I’ve sporadically added content upgrades around the piece. Most site owners allow that because you give extra value, even if you’re redirecting people to your site. When in doubt, ask first.
I’ve gotten a few dozen leads from these content upgrades, which at the beginning of your freelancing career can make a big dent in your business.
So you got a few guest posts, now what? Do you just wait until companies come up to your ready to pay you for your writing services?
Not really. You may get a few high-quality leads — the higher the authority of the site in which you guest published, the better chances you have — but don’t count on it.
In my experience, I got my first top clients by guest posting alone, even though that wasn’t my plan.
Guest posting is a way to get your feet in the door — pitching is what will open the doors for you.
Your job in this step is to find companies with whom you’d like to work and pitch them your services — but not in that way.
Pitching is another name for selling. Therefore pitching your services requires you to position them as a way to overcome your prospect’s needs and problems.
In exercise #11, I will show you a template you can use to position your services. For now, I want you to memorize this important aspect of your pitch: pitching it’s all about your prospect.
Remember that, and you’ll get clients.
Before anything, you need to find the companies to pitch. The companies are going to be the best ones in your industry (or niche), regardless of whether they’re looking for a content writer.
Here’s how to get started.
The pitching is an almost never-ending process in which you improve, refine, and continue to use over time. But after a while, the effort won’t be worth your while, both time and money-wise.
The ideal is to have a constant stream of prospects coming your way. To do that, you need a traffic-generating hub — a marketing engine that drives traffic and leads consistently.
To that, you must have your own site. You can call it a company, a business, a side-hustle, a blog empire, or whatever it is you want to call it. The point in case is that you need to have your own personal hub.
Fueled by your content — whether that includes blog articles, podcasts, videos, or a mix of them — your hub it’s the place where you communicate with the world, showcase your style, and build a brand.
In step #3, you had created a blog where you’d place your content. This is where you take that blog and take it to the next level.
Pro Tip: Until you’ve got at least a half a dozen guest posts published under your name, I recommend you focus exclusively on that goal before you work on your own site. The hub should be a long-term goal to fulfill after you’ve become a professional freelance writer.
I put this step in here, so you become aware of the importance of being strategic and thinking long-term. You don’t want to be another freelance writer that makes enough money to keep yourself above water.
If your goal is to use freelance writing as a side hustle, then this step is optional. But if you truly want to make a living off your writing, then you must build your hub.
The creation of your hub will take you many months, if not years, and a lot of hard, consistent work. You will need to learn about your readers, their needs and pains, and the best way to solve them through your content.
Explaining this final step would take me another separate article. Since we’re already way above the 7,000 words, I know you must be tired already, so let’s quickly see how you can build your hub.
This guide taught you how to get started as a freelance writer with no experience. Now it’s time to get started implementing these steps.
Becoming a freelance writer isn’t rocket science; you only need hard work, dedication, and a love for writing.
If you implement each of the exercises shown here, you will be able to reap the same benefits I’ve been able to get.
Download the checklist below with twelve exercises to get you started on your freelance writing path.