How to Create a Winning Writing Portfolio to Land More Clients

A writing portfolio is the lifeblood of any writer. It’s like having a sales rep 24/7 that closes deals on autopilot. 🤑
Fortunately, the process of creating a writing portfolio is easy. What’s not so easy is creating one in a way that “wows” your prospects. 😮
But don’t worry, because I got you covered.
If you want to get a close look at how I’ve created a writing portfolio that has generated thousands of dollars per month for the past few years, this guide is for you.
I will show you how you can create a simple but effective website that will allow you to build your brand, showcase your best work, and get clients pouring in. Plus, you will learn what’s the best writer portfolio site to use in 2024.
Let’s dive right into it.
Update 2024: I added this new section to highlight the importance of your writing portfolio, which may not have been clear before. Also, I explain why a website is more important than a portfolio. In my view, the former complements the latter. By “writing portfolio,” then, I mean both your website and the portfolio you have in sites like Contently or Clippings.me.
The idea behind a writing portfolio—and any other type of portfolio—is to present your work to a potential client (also known as a lead). The job of your portfolio is to tell the lead, “here’s who I am, what I can do, and what I could do to you if you worked with me.“
In our case, your writing portfolio will showcase all your work so a lead can understand:
To paraphrase the famous saying, your writing portfolio “doesn’t tell; it shows.“
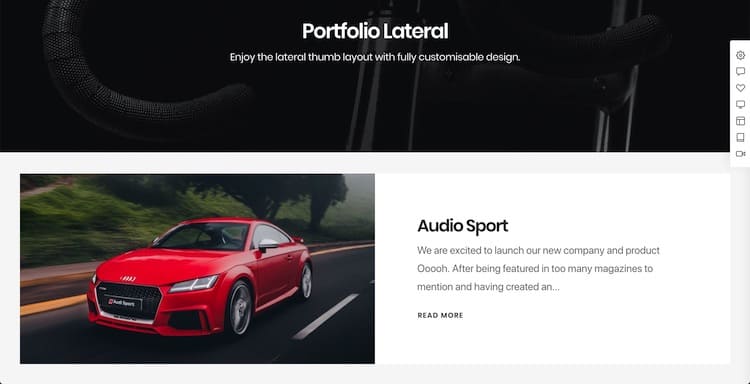
By the end of this article, I want you to be able, at the minimum, to have something like this:

That writing portfolio is hosted in a specific portfolio site for writers called Contently. Later, I will show you how to use it.
Ideally, you want to develop a website. Your website works as the storefront of your business. If you want to get your writing portfolio to generate business, then your website will be what causes your leads to talk to you.
Think about it this way: your website is a restaurant where you get your leads to meet you; your portfolio is the menu.
In the next steps, you will learn the basics of setting up your writing website and writing portfolio. If you only want to learn the latter, jump right to step #5. Otherwise, let’s start from the beginning.
Before you can develop your writing portfolio, you want to make a list of all the pieces you have ever written. At this point, you can disregard their nature—articles, landing pages, press releases, or ebooks—their date of publication, or its topic. The organization comes later.
When I first got started, I had less than a dozen pieces under my name, all of which were more than a year old and pretty mediocre. Some were even written on my personal site or in Medium, the open blogging platform.
I will be honest: I wasn’t proud of my work. It didn’t feel like a fantastic portfolio, but it was one nonetheless. I knew that I had a few golden nuggets in there that would help me a lot, like a Shopify piece I had written.
What’s more, I knew there was a lot of potential in me. I knew that with the few pieces I had written, I could develop a high-quality portfolio that would close all the sales for me.
If you are in this same position, worry not. Many new freelance writers start with nothing—no contacts and no experience—so if you’ve written a few pieces, you are much more prepared to succeed than you think.
Lift your shoulders, put on a broad smile, and prepare to open your portfolio, where the fun begins.
If you haven’t written anything yet and you’re trying to get into the freelancing world, you need to start somewhere. In my guide on becoming a freelance writer, I explain with detail how to do that, so check it out.
Your portfolio is like a ramp that helps you build the momentum to start your freelance career; it does the trick of showing your content for some time.
But you don’t want to have a freelance business; you want a brand that represents you.
You want to position yourself as the ultimate writer in the mind of your prospect. You want them to think of you whenever they need content, the type of content that drives the results they want and need.
To that extent, you need a website. A website takes the main benefit of a writing portfolio—which, as I said in the intro, is like a 24/7 sales rep—but adds more substantial business elements to it.
Your website will help you develop a brand around you and your services; it will help you connect with your audience and show your skills in more profound ways than a portfolio ever can.
Whenever someone checks your portfolio, they’re like a shopper buying clothes at Gap; they pick what’s both cheap and appealing.
When they check your website, they are like the Apple fanboys who wait for hours to get their hands on the latest Apple launch; they trust you and want to work only with you.

This is how your visitors behave when they’re on your site. Source
Below, I want to show you what I’ve done to build this website, and what I’d do if I had to start all over again so you can make yours without the BS.
You need four elements in place to develop your website:
Next, I’ll break down how to buy and set up each of these four elements.
Your domain will represent your brand like bestwriting.com represents Best Writing. If you don’t know what name to pick for your domain, in the freelance writing guide I said:
The name you choose for your site could follow one of two options:
When you’re just getting started, keep this simple. Eventually, you can redirect everything to a new name site, which isn’t that big of a deal.
It’s so easy to get bogged down on the perfect name for your site, something that ends up becoming an excuse for not starting your freelance writing career.
Don’t let that happen to you. Just pick a name and keep going.
Once you decide on a name, all you have to do is go to GoDaddy, put your name, and get a .com TLD.
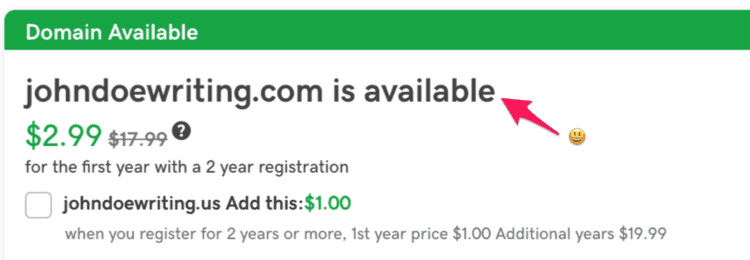
You buy a domain in other domain providers, but I haven’t tried them, so I can’t recommend them. You can also buy your domain through your hosting provider. In any case, you won’t spend more than $15 on this expense, and it will be worth a lot down the road.
If you can’t get a .com TLD, add a prefix or suffix to your name and see if it’s available. For example, in my case, I could try:
The ones about a brand name aren’t so good, so I’d recommend you use prefixes or suffixes if you chose to buy a name domain. In the case of a creative name, change it so it fits your domain.
After you get the domain, you need hosting. There’s too much information on the best blog hosting site, and most of it’s misleading. All I can tell you is that my favorite hosting companies I’ve used and recommend are:
Bluehost is the best option for when you get started. It costs $3.95 per month, and it has all you need to easily set up a WordPress blog without any distractions. They also provide a free .com domain for your first year, a great deal.
Bluehost’s low price, however, comes at the cost of performance and security. The company keeps its prices low because each client shares their hosting with other ones. If you want fast performance, Bluehost isn’t your best choice.
Still, shared hosting isn’t a problem when you are launching your portfolio. I used Bluehost for many years, and I can’t remember any issues I had with them. As a beginner, it’s the best option you can take.
Flywheel is my current hosting provider, and so far, the best one I’ve ever had. Unlike Bluehost, they’re a “managed WordPress” hosting provider. That means, they take care of doing daily backups, updating WordPress’s latest version, and many other things Bluehost cheap plan doesn’t provide.
For $13 per month you get:
Also, in the case you start with Bluehost and you decide to jump to Flywheel, they will do the migration for free. I used it, and it was flawless.
Think about it this way: for $10 more than what Bluehost charges, you get performance and security, plus free themes and a lot more. If you take your freelance writing business seriously and you plan to attract traffic to it, I recommend you get Flywheel.
WP Engine is one of the forefathers of the concept of “WordPress hosting.” In the past few years, they’ve geared towards the enterprise world.
WPEngine offers almost the same as Flywheel—WpEngine actually owns them—and their cheapest plan starts at $25 per month. It seems pricier than Flywheel until you realize their most affordable plan gives you up to 25,000 monthly visitors. Flywheel’s second cheapest plan is exactly the same.
I’ve not used WPEngine, so I can’t speak from experience, but I will seriously consider moving to their turf use once my site grows to the six-figures in traffic. If this isn’t your case, then go with Flywheel or Bluehost—ideally, in that order.
On theory, you could create a static HTML page where you show your portfolio, your story, and nothing else. This idea, unfortunately, is slightly harder to implement than you think.
A much better way to set up your website is to use WordPress. It’s both easy and free to use, so there’s no reason you shouldn’t use it. Also, all of the hosting providers I recommended above let you install WordPress with one click.
As soon as you buy your domain and get your hosting provider, you want to redirect your domain to your hosting—if you purchased your domain with your hosting provider, you can ignore this tip—and then install WordPress.
The last thing you need is to buy a WordPress theme for your writing portfolio. Ideally, the theme you buy should be easy to use and minimalistic.
There are more WordPress theme companies you can count, so to help you pick the right company and theme, I will recommend you three companies I’ve worked with. The three recommendations you are both based on my experience building my freelance writing career and what I deem the best themes for this same purpose.
The first option is StudioPress. I’ve been a user of theirs ever since I started my digital marketing career and they have kept their quality throughout all these years. Their designs are beautiful, while their themes are easy to install and customize.
You will notice when you visit StudioPress’s website that they charge you for their framework, Genesis, and their theme. If you think this is a sly way to overcharge you, I can assure you it’s not. On its own, the Genesis framework is worth the investment; it’s what makes StudioPress’ themes so good. The theme you buy it’s built upon their framework.
My favorite theme I recommend you use is Digital Pro, which I used to use some years ago. It’s clean, elegant, and simple enough to publish your portfolio.

Mel Wicks, a freelance copywriter, uses this theme in his service page, which looks incredible.
Another popular theme is Authority Pro, which is made for bloggers and writers who want a minimalistic theme like Digital Pro.
You can see how Tara Malone, a freelance content writer, uses Authority Pro. While her portfolio lacks images and context, it’s still effective at showcasing her work.
All StudioPress’ themes work with WordPress’s latest editor, Gutenberg. They are also optimized for speed and SEO. Finally, they all come with templates to build landing pages, something that will be useful once you develop your full freelance writing service.
Another option is to buy a theme at Elegant Themes. Their company has a long story in the WordPress theme community, and their name is one of the most popular ones around.
Like StudioPress, Elegant Themes don’t sell themes individually; they sell their framework, Divi, on which you install one of their themes.
What makes Divi so unique is that it’s not just a framework but a theme builder. That is, you can use Divi to create your own layout, completely unique to your tastes. I’ve used them on several side projects of mine, and it has never disappointed me.
You must be careful; just because you can build your own theme doesn’t mean you should. Instead, you should get something clean and professional, and then move on to what really matters: get new client work.
Since they don’t have themes but layouts you can upload to your Divi Builder (more information on how to do that here), I want to recommend the best two I’ve found.
Last but not least, you can buy a theme from ThemeForest, the largest marketplace for WordPress developers. In ThemeForest, you can find thousands of WordPress themes at a relatively low price.
The one thing I like about Themeforest is that you can find almost an unlimited amount of themes. If you don’t like Studiopress or Divi’s options, you will likely find something in ThemeForest.
I’ve used some themes I bought in ThemeForest, and I haven’t been disappointed. Three themes I’ve considered buying in the past and which I’d recommend you to look at are:
These themes are among the most popular themes, with thousands of sales each and a great number of positive reviews.
All of these themes are highly customizable, very much like Divi’s website builder. But what truly matters isn’t that you use all of the flashy features these themes have and use the ones that let you create your writing portfolio. Since they all have this feature, all you have to do is use it in your portfolio page, which you will create in the next step.
The main disadvantage of ThemeForest’s themes is that some of their sellers aren’t big companies with a track record of success, unlike StudioPress and Elegant Themes. You should always buy a theme from a reputable seller and read the reviews, but when things go wrong, it may be harder for you to get good customer service. These three themes I shared aren’t the case, but if you buy one that’s not as popular, you should be careful.
While you’ve already created a Contently portfolio, it’s a good idea to create a portfolio page in your new site.
If your website is your shop, then you want to have your goodies lined up in the front door, so your customers can see them as they walk down the street, don’t you?
To create a portfolio page, hover the “Pages” link in the sidebar and click on “Add New.”
Name it “Portfolio” and publish it.
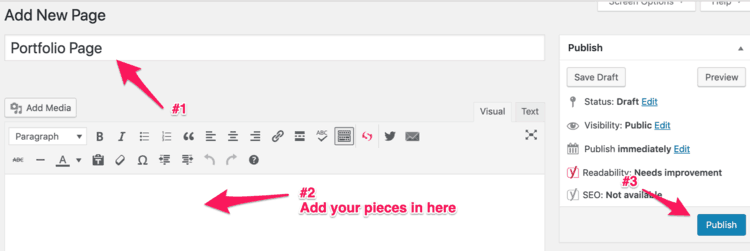
In here, add all your pieces (or your most favorite ones) and, if you can, give them a basic explanation for context.
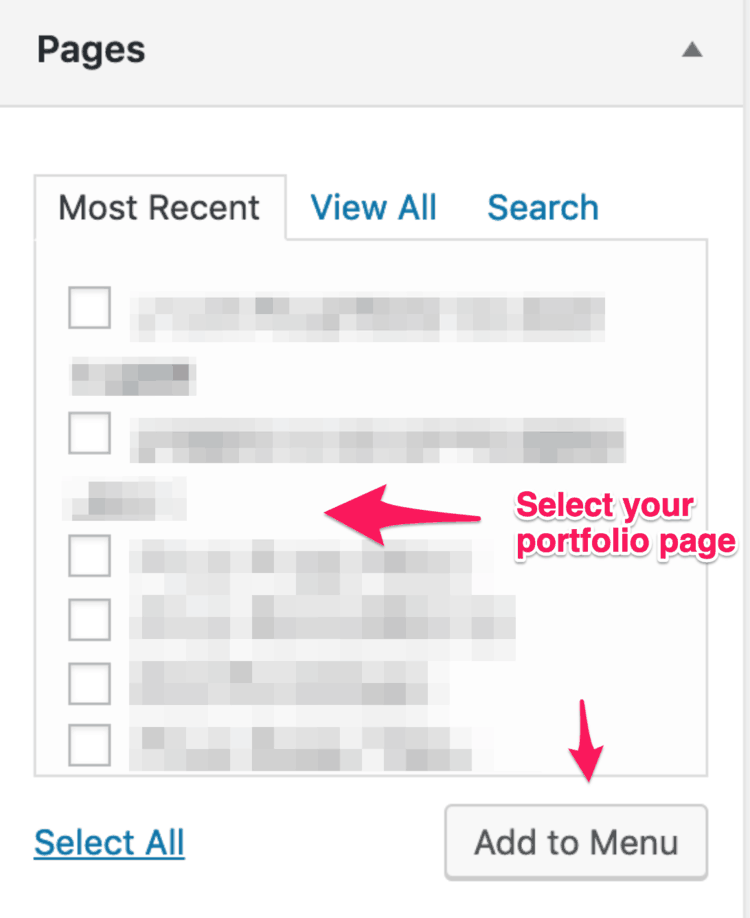
Finally, add this new page to your menu. Instead of adding a link, however, you will add a new page.
In the left sidebar, find your portfolio page, select it, and click on “Add to Menu.”
You’re almost done creating your page. Before we move on to the last (and most exciting) part, let’s take a look at your “About” page, an elemental part of your brand.
The about page is a key part of your site where you present yourself to the world; it’s a story-driven, value-focused business card. In it, you take your prospects from thinking, “who’s this guy?” to “how can I work with him?”
Any high-converting about page has six elements that characterize them. When you set it up, remember to add each of these elements so you can increase its persuasive power.
First and foremost, your “About” page needs to talk about your unique value proposition—that is, the value you bring to your prospect.
Since you are getting started, focus on a simple sentence that sums up your service’s value. Most freelance writers I know, often focus on any of the following value proposition:
Your value proposition needs to be unique to you. After all, it’s called a unique value proposition.
For example, in my old about page, I asked my reader:

I know my content can deliver traffic because that’s what I like doing, and that’s what I’ve done for my previous clients.
Write the answer to the following questions:
In the business world, there’s a lot said about developing a mission statement. Most of it is nonsense.
How often have you seen a company saying that their mission is to “satisfy our customers” and then get ignored whenever you contact them for support?
Because mission and values are personal, you can’t “develop” them out of thin air. And since this is your own business, they shouldn’t be separated from you either.
I like thinking that your mission and values are an extension of your identity.
For example, I love writing, and I’m extremely proud of the content I write. For that reason, it’s my mission to make the best content on any subject I write. I didn’t decide on this; it just came out of me.
My values are dedication, truthfulness, and attention to detail.
I say this because all my content shows I dedicate a lot of time into it, I care about the truth of the subject, and I focus on the smallest details to make it look good.
I recommend that you write a sentence or two about your mission and values, but at the end of the day, it’s more important that you show both of them through your actions and results than through your words.
Here’s a great example from Aaron Wrixon, who does a fantastic job of explaining his company’s values:
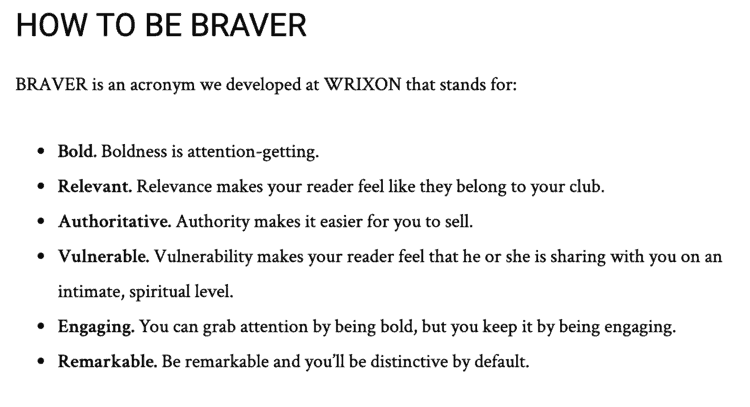
Write the answer to the following questions:
The answer to these questions will shine a light on your values as a writer. Use them in your about page.
The reason why any lead would check your site is to get to know you. If a lead wanted a cheap writer, they’d have gone to Upwork or Problogger. On your site, they want to learn about you.
Sharing a brief personal story will help create an emotional connection with them. This can simply explain how you got to become a writer, the experience you have, and the purpose that drives you to work as a writer.
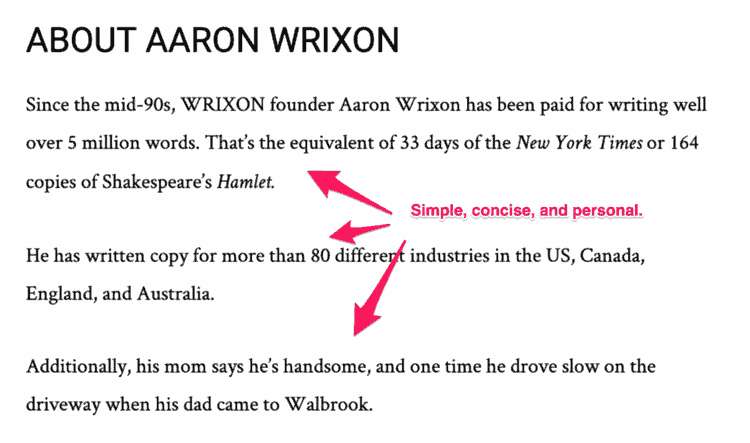
Once again, here’s a good example from Aaron Wrixon, who explains who he is:
Write down your story as a freelance writer. Don’t focus on the small things, what matters is the narrative, the way you connect each step of your way. Consider answering the following questions which will help you distill your story:
Your visitors will want to check if you are for real. Social proof elements—e.g., past clients, awards, badges, professional licenses, educational diplomas, press mentions—will help you add a third dimension to your about page.
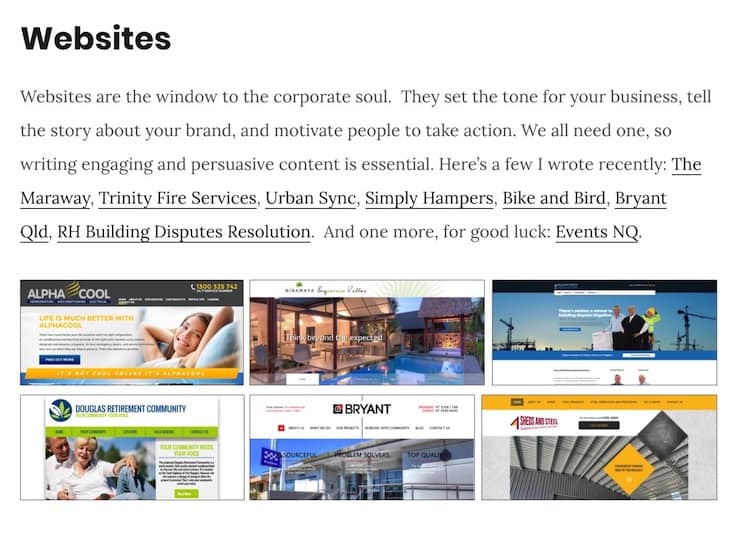
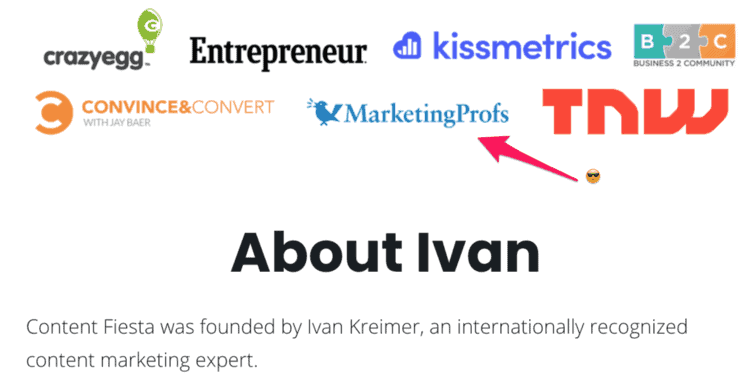
In my case, I mention the clients with whom I’ve worked and the sites I’ve published on, both of which work great to prove myself to my reader.
In my site, I give two rounds of social proof: one at the beginning, where I show the companies I worked for (you can check that in the image I showed above), and one where I show the sites I’ve written for.
Make a list of all the most prominent sites you have written for. Include pieces you have ghostwritten.
A more powerful way to show your worth is to use case studies. They are where the rubber meets the road; you’re showing what you can do.
Earlier, you saw that having a USP and mission matters, but your case studies make them tangible and real. It’s one thing to say your content drives traffic; it’s another to show the traffic you’ve gotten.
If you have any results you can share, then do it, as I have in my Campaign Monitor case study.
If you have a successful client you are proud of, write down:
Include screenshots and testimonials, if possible.
One great about page that shows all of these elements in place is the one from Jeff Goins:

In a few sentences, every element (except case studies) makes his about page highly relevant for anyone interested in getting to know him.
Your about page doesn’t have to be complicated. Add these six elements I showed in here in a few sentences, and it will be above the competition.
I’m a big believer in treating your freelance writing service as a business. Asking you to open a website with a domain, hosting, and WordPress theme will level the field for you, putting you in a position of power.
The website you create will help you show your writing portfolio, explain your brand—even if this is your name—and command the respect you deserve.
With all this said, then you may be wondering why I’m asking you to open an account in a writer’s portfolio site. Isn’t this redundant?
It seems so, but I think these sites have one advantage over your website: simplicity. You want to have a website that works as the “24/7 sales rep,” which I described in the introduction. On the other hand, your client may not want to spend time on your website—they want a confirmation of your quality as a writer.
A portfolio in an industry-specific website will be the second-option you want to use to show off your best work and let your potential clients see four aspects of your work:
Ideally, the portfolio you create on your website should let the client see these answers. If you have a portfolio that mimics the visual layout of the sites I’m about to show you, you can skip this step.
But if you are short in time, have no budget to spare, or your portfolio page doesn’t look as clean as the ones from the writing portfolio sites I’ll show you, make sure to follow this step. It will take you 30 minutes of your time, and it will be a useful way to take a snapshot of your entire career while matching the expectations of a time-strapped client.
With this said, there are three writing portfolio sites to consider:
All of these sites are free and easy to use. I have only used the first two. Historically, my favorite one was Contently. More recently, I’ve started using Clippings.me because they have improved their service considerably and have a modern professional look Contently lacks. Contently hasn’t improved their service in the last few years, and it doesn’t seem so good as it was before.
Since I’m more experienced with Contently, I will start how to create your writing portfolio with Contently. Then, I will show you the same with Clippings.me, which is much easier to use and very similar to what you need to do to Contently.
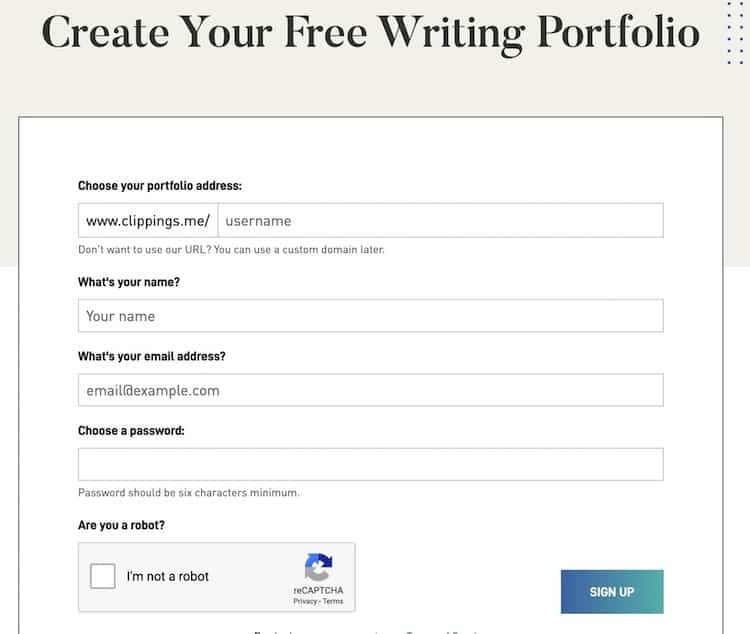
First, go to Contently and click on “Freelance with Contently.”

Then, add the personal info requested, like name and email, and verify the latter to finish the registration process.
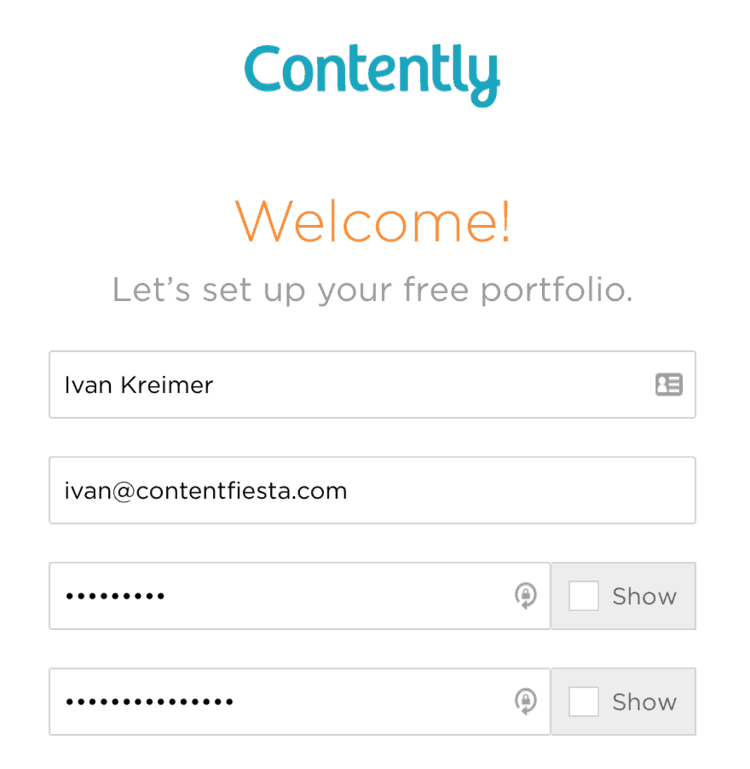
That’s all you’ve got to do to open your Contently account. It’s that simple.
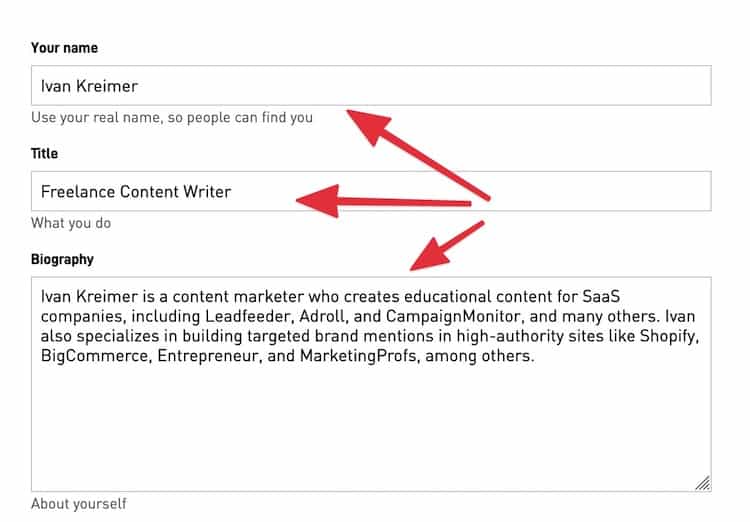
Now you’ve opened your account, you want to make your profile shine.
Take a look at my profile:
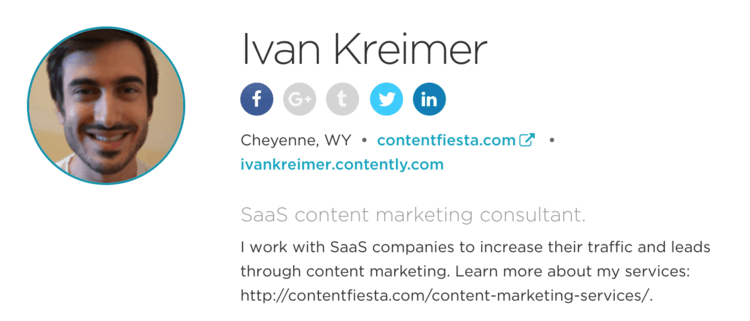
While there’s not a lot of space in there, I still added all the relevant social profiles, a (good?) profile picture, a link to my site, and a small piece of content that highlights my value proposition.
It’s easy to add your images, website, and social profiles, so I won’t explain how to do that. The part I want you to nail is your value proposition.
First, your title. In here, I want you to explain two things:
In my case, my title says, “SaaS content marketing consultant.”
That is, I’m a consultant (not a freelancer, which isn’t as valuable) who helps SaaS businesses (my audience) with content marketing (which is more valuable than writing alone).
Such a description isn’t an excellent piece of copy, but I can assure you most writers won’t put time into this, which is like trying to start a marathon by shooting yourself in the foot.
Make sure to add specificity and clarity in your title. Tell your prospects what you do and who you serve.
While this is a topic for another post, in the simplest terms, you could explain that you offer:
You can also throw an adjective in there, like “high-quality” or “authoritative,” but I believe that’s redundant. If you want to tell your leads your content is high-quality, then just show them that content, and they will figure it out on their own.
Your description is an extension of the title, a clarification if you will. In my case, I wrote:
I work with SaaS companies to increase their traffic and leads through content marketing. Learn more about my services: https://bestwriting.com/services/.
There’s no need to overcomplicate this and try to sound like a sales rep. The only thing I added in there that I think adds more power to it is the outcome I work on — in my case, to increase traffic and leads.
You can also rephrase your title idea as a question, something like:
Do you want more traffic and leads? Then I can help you with my content marketing services.
Finally, I added a link to my services page. If you don’t have a website yet, don’t worry as you will take care of that in step #4. For the time being, I recommend you add a call-to-action in there so you can take the conversation further.
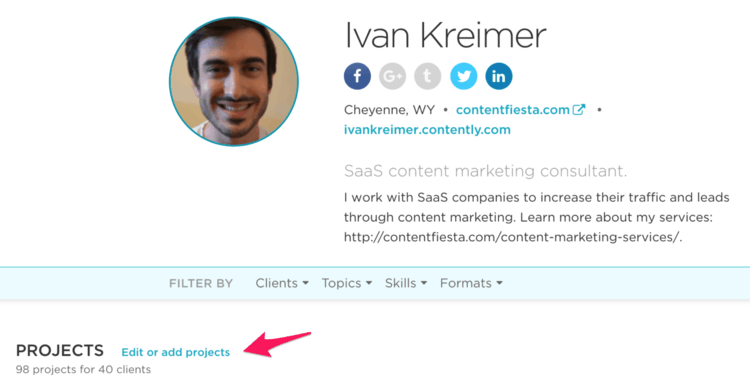
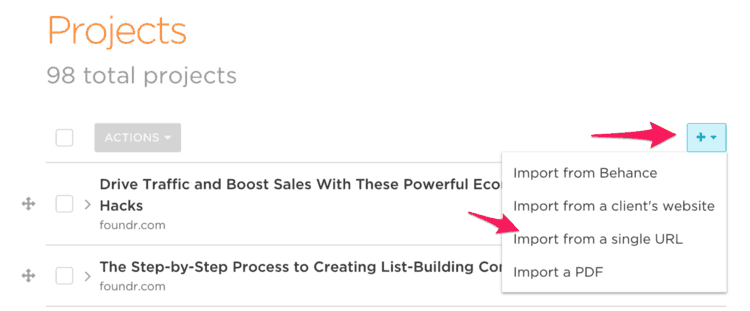
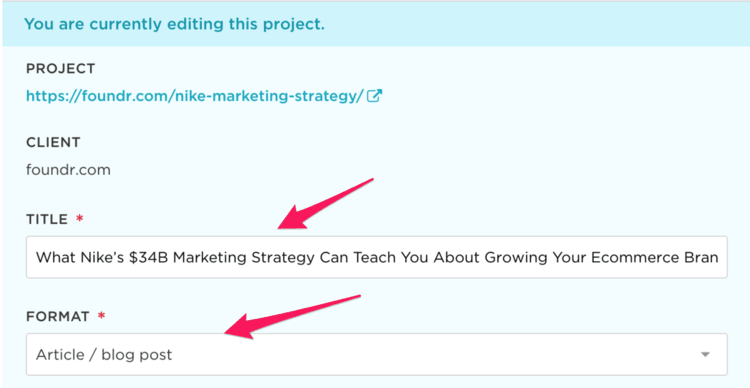
After you’ve set up your writing profile, it’s time to add your pieces to your newly opened portfolio. The first thing to do is to click on the “Edit or add projects” button.
Then, click on the “+” button in the top right and click on “Import from a single URL.”
Add the link in the bar and click on “Get Details.”
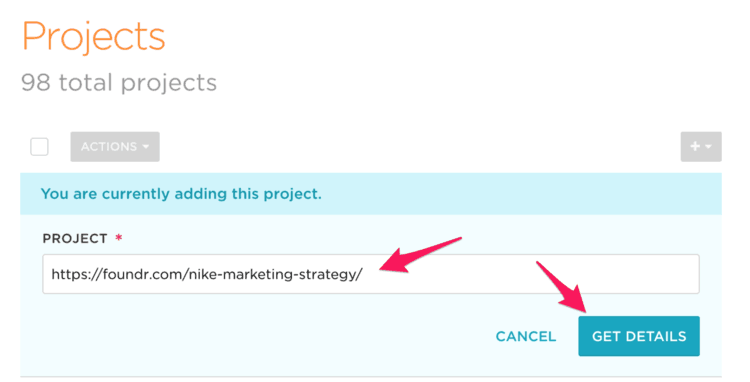
Many times, Contently doesn’t fetch the data appropriately and makes it look bad, so make sure it looks just like the name of the article is named. In this example, Contently imported the title correctly, but if it doesn’t, make sure to fix it.
Then, you have the format. Contently adds a large variety of content formats which it uses for its writing platform. This doesn’t matter too much, but since I’m doing this already, I select the “article” format. Choose the one that best describes the piece of content you’re adding.
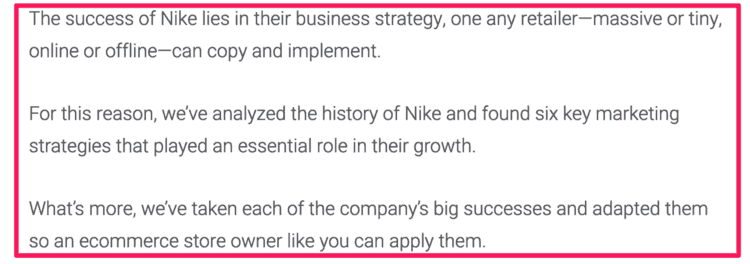
Next, you have the second most important part of the piece: the description. In here, Contently takes some data from the post, often the introduction, and adds it as the main filler. More often than not, the content it takes is too long and looks awful, which ruins the piece’s look.
That’s why I often take the intro and rewrite it slightly, or cut the unnecessary parts and leave it as it is, but looking tighter and clearer than the original one.
Since Contently took the first ~200 words of the piece, which don’t describe it accurately, I went to the article itself, and copied and pasted the last part of the intro into the “Description” box.
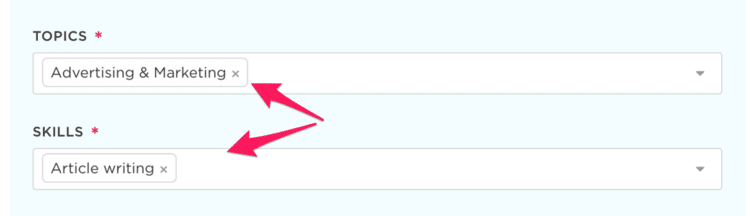
Finally, you’ve got to select the topics, skills, and images to show. The former two categories are for Contently’s platform, so unless you plan to use them to generate leads, they won’t matter much. As I said with the format category above, I still prefer to choose the correct option.
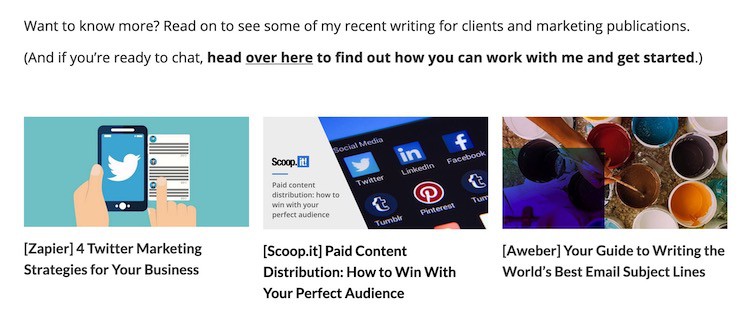
Now you can see how well this piece looks in my portfolio:

If you check my writing portfolio, you can see how well organized I made it look. I put my best and most valuable pieces at the top, all with images, summaries, and attractive headlines.
Remember to add all the pieces you’ve written, even the ones you don’t like. If you have the volume, then you can select the best ones, but if you don’t, add anything you can. You want to look like you are experienced and not an amateur who decided to try this “freelance writing thing.”
What’s more, take the time to make each post look great. It took me a few hours to add all my original pieces, but I believe it helped me stand out from the crowd.
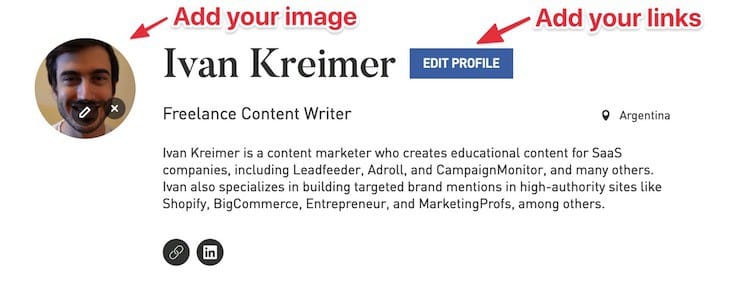
Start by going to Clippings.me website and opening an account.
Then, add your personal information.
Once you have created your account, add the same description as the one you used on Contently.
Then, add your profile picture and after it uploads, click on the “Edit Profile” button so you can add your site’s link and any social media account you want.
The one aspect I like about Clippings.me is that adding an article is even easier than in Contently as the former parses the data better than the latter.
So far, I’ve not found the problems I’ve faced on Contently. What’s more, Clippings.me asks for less information than Contently, so it takes literally three clicks to add an article. To do that, click on the “Add Item” button.

Then, add your article link in the first option available and click on “Add.”
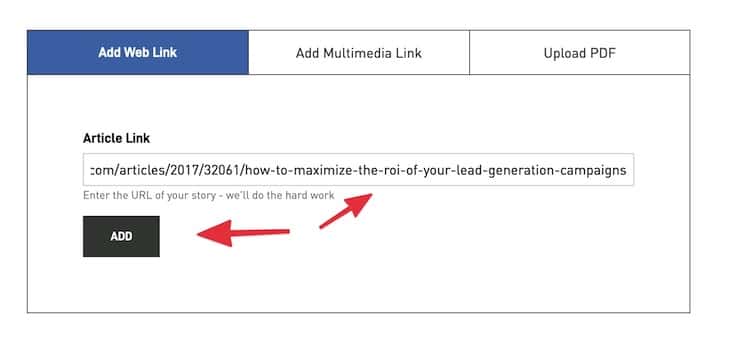
That’s it, your article is now in your portfolio.
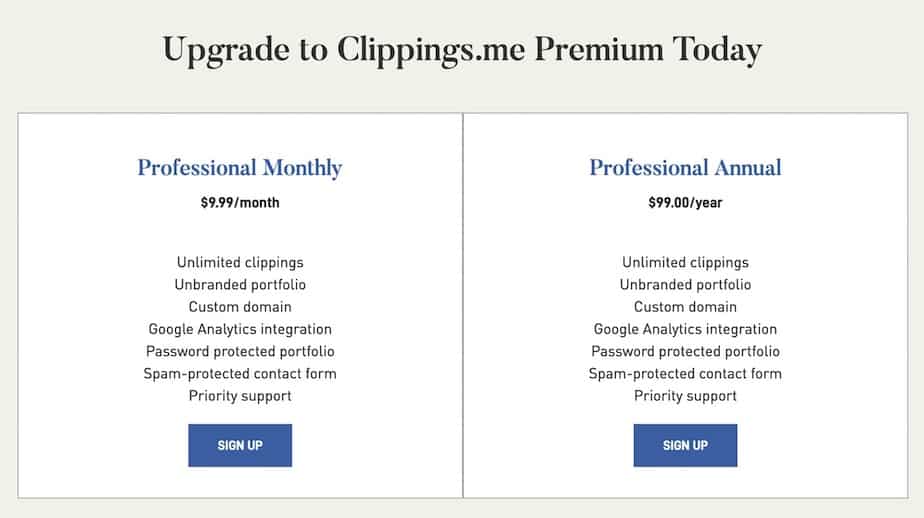
The overall look of Clippings.me is way more professional than Contently. The only caveat is that Clippings.me lets you add up to ten articles for free. From there, you have to pay $9.99 per month or $99 per year.
If money isn’t an issue and you won’t be using a website, use Clippings.me. The same advice on your profile information—your title and description—applies to Clippings.me profile. Otherwise, use Contently—it’s free, simple, clean, and relatively easy to use.
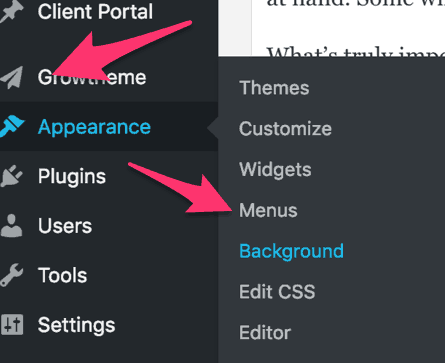
If you want to show your portfolio in your site, then all you have to do is add a link in your top menu.
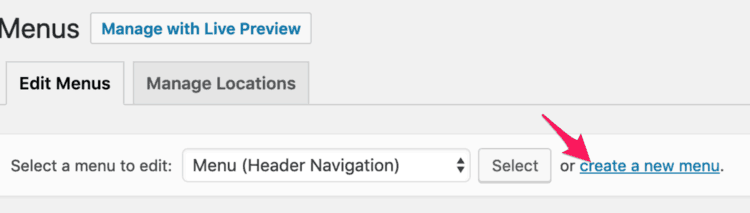
In your WordPress menu to your left, hover the “Appearance” button and click on “Menu.”

If you already have a menu, scroll down a bit where I explain how to add the link to your existing menu.
If you don’t have a menu yet, click on the “create a new menu” button.
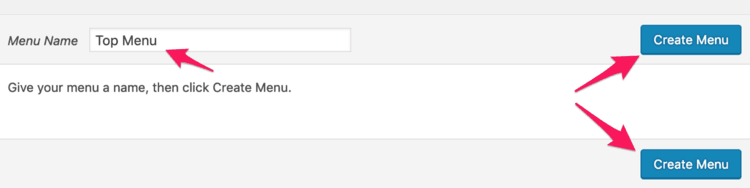
Give the menu a name, like “top header” or something of that sort, and click on “Create Menu.”
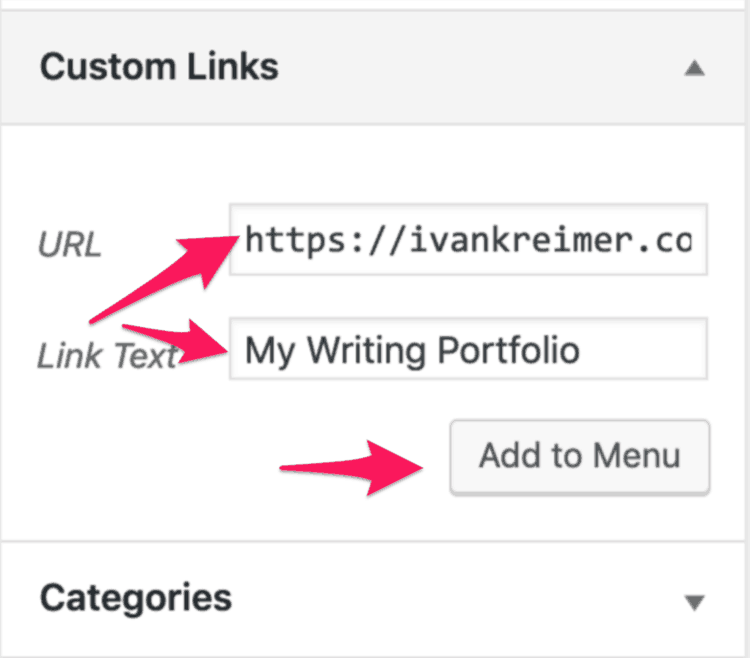
Whether you created a new menu or not, to add a link to it, you need to:
Click on “Add to Menu,” and that will add your portfolio to your menu.
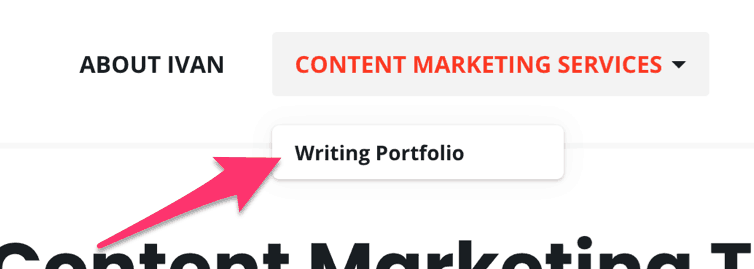
In my case, I nested the portfolio link within my “Content Marketing Services” page.
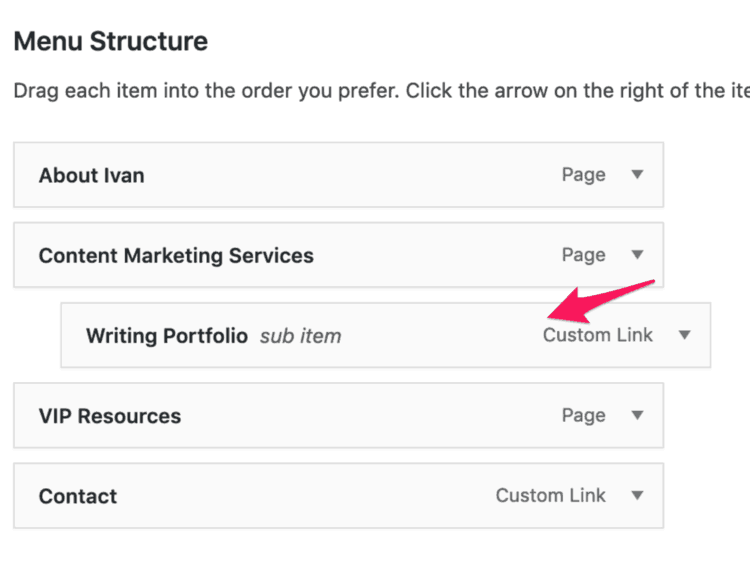
Here’s how it looks like:
Besides Contently, you want to have a mini-portfolio anywhere you can. This includes your Twitter feed (which you populate by sharing your posts), and most importantly, your LinkedIn profile and website.
Don’t forget that your content’s promotion doesn’t stop in the portfolio; you need to keep it everywhere you go. There’s no better marketer than yourself.
Last but not least, you need to have a contact page where your clients can, well, contact you.
A contact form is always good to let your visitors contact you for whatever reason (these days, it’s mostly people asking for guest posts). But in this step, I want you to create a specific type of contact form that lets you qualify your visitors who are interested in doing business with you. The questions you will ask will be exclusively focused on getting the most amount of information from those who want to work with you.
You may want to use both a contact form as your service form, but I prefer that you don’t. Not only it doesn’t look professional, but it also wastes everyone’s time. The vast majority of people who contact you won’t be the right one and you want to know that as quickly as possible.
To create a service contact form, you want to create a page similar to the one you created before in step #3, but instead of adding your content, you want to add a form. To this extent, you can install a form plugin like WPForms. They are simple to create and easy to install.
Nowadays, however, I like using a much more modern and sleek type of form from a brand I like, Typeform. These forms don’t look like your typical form as they work in a way unlike any other tool I’ve ever used. If you don’t believe me, go to my service page, click one of the buttons, and see it for yourself.
To create a Typeform like this, all you have to do is:
Your service contact page should aim to get information about the following topics:
My service contact page starts by asking the following information:
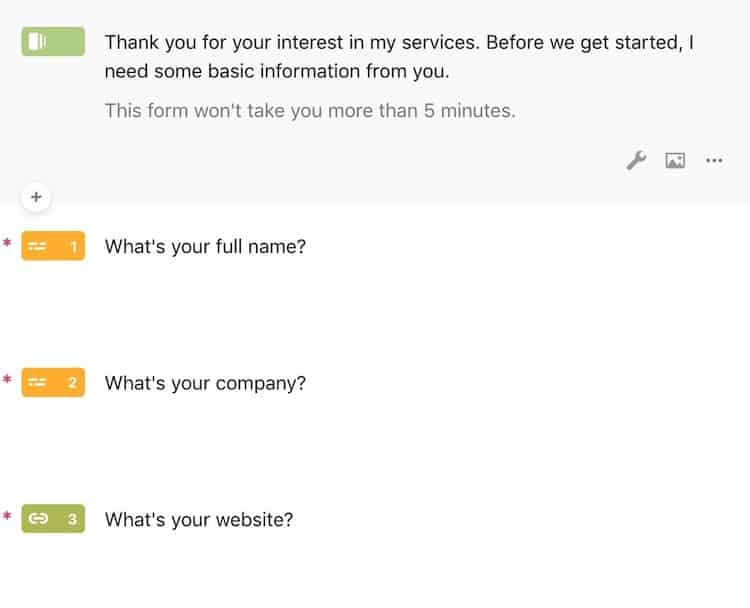
These are the basic contextual questions I need to know to see if the people who are contacting me are who they say they are. You’d be surprised by the number of shady people who contact you.
Then, I ask more specific questions regarding the project:
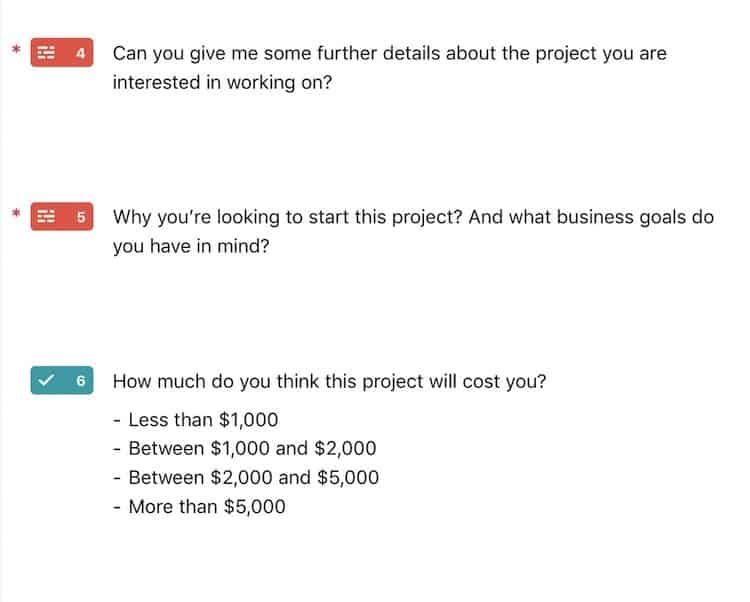
These questions are only to get a feeling of the project the lead has on their mind. By no means I want a detailed explanation—that’s the job of the call I have later on.
After I get these answers over email, I ask the lead for more details over email until I see if it makes sense to jump on a call and discuss it further.
In principle, that’s all your service contact form should do: qualify people.
Once you have created your Typeform, add the link to your portfolio page. You can even create a button as a CTA to make it even easier to get people to contact you. In either case, you are done!
Developing your writing portfolio isn’t static; you need to continuously add new pieces to make it better every week. Your goal is, as Cal Newport puts it in his phenomenal book, “So Good They Can’t Ignore It.”
Your writing portfolio will grow over two axes:
First, you need to know the topics that you can write nonstop for at least a year. When you’re getting started, you need to get yourself known, so the more you publish — as a guest post, for a client, or in your site — the better.
Ask yourself:
In my experience, this isn’t a black-and-white answer, where I defined I wanted to write about content marketing. Instead, it was something that I knew in my gut and just let myself get carried by it.
On the other hand, you need to have a shortlist of sites you’d like to publish on. In my case, I have researched a large volume of sites that accept guest posts and contributions. I had over 100 sites that I’d like to write on, from BigCommerce and Foundr (two sites I ended up writing in!) to FastCompany and Wired (where I haven’t written…yet).

I could share that list with you, but this isn’t relevant for everyone. Your industry and niche will have its unique list of sites where you can publish on. For that reason, I recommend you implement the advice I laid out in my guest blogging guide.
Let’s quickly go over this so you can develop your list of sites to publish.
The first step is the most entertaining: make a list of all the dream sites you’d like to write on.
Put a timer for 20 minutes and brainstorm any site you’d like to write on, regardless of its size of the chances you have to get published on it. If you want to write at Vogue or Harvard Business Review, go for it.
After you’ve done this, let’s take the SEO-friendly way (i.e., the nerdiest 🤓). Make a list of 20 keywords around your industry and use them with each of the following search footprints:
Ideally, you should add the sites that you know that accept guest posts. Most of the footprints above focus on that, so you should be fine, but double check.
This entire process will take at least 2 hours, but should probably take 10 hours since this is the foundation on which you will build your writing profession.
With this list, you need to follow the advice I laid in my freelance writing guide, which includes a more detailed explanation on:
The key behind every successful freelance writer is to continue growing their portfolio, improving their skills, and becoming an authority in their industry. It’s a never-ending process, that’s why this step has an infinite sign on it.
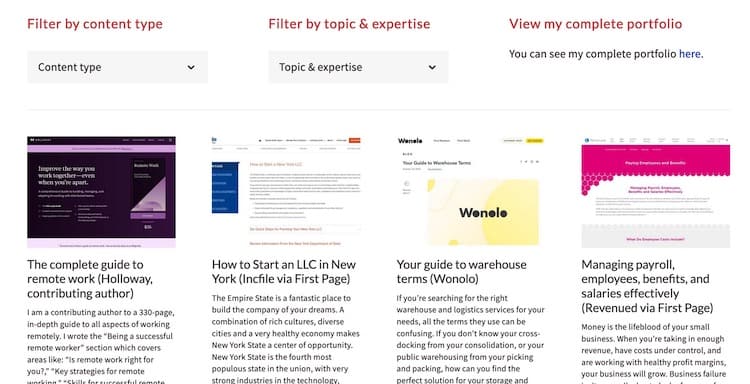
It’s not common to see writers showing their portfolios on their sites. But since I’ve talked so much about this in this article, I want to show you three cases of writers who have amazing portfolios in their sites.
What I Like
What I Like
What I Like
Now you’ve seen what it takes to build a writing portfolio, it’s time you get started.
If you already haven’t taken any action yet, then pick up the following checklist, which makes all the steps mentioned in this guide, and get started working.